Monday, December 6, 2021

Mixed Media - Altered Wooden Door - Joy

Welcome! Today I would like to share with you my first Christmas decor of the season. 

Won't lie . . . this took quite a bit of planning and set-up. I had to order the colors, order crackle paste, cut the dies, shop for glitter and create the moulds. That just means I now have all the supplies in my stash for the next one!

I was hugely inspired by the video of "Altered Brush" by Sanna Suomalainen. I used her process and colors scheme while adding my own twist to my piece.

All the supplies are listed below.


First I applied gesso, followed by PVA glue (Elmer's glue) then the crackle paste. Finnabair's crackle paste seems to be impossible to get here in the U.S. these days so I'm having to go a different route.
This step alone took several hours cause needed to let dry without using the dry heat gun.


I then applied White Sand paste, followed by glitter. Once that dried, I began the color process with Soft Satin and Steampunk Copper.


The composition of this piece went fairly quickly. I did use Lindy's embossing powders on my die cuts to add just a little more dramatic effect.


The title is embossed with Midnight Gold. The whole piece was then dusted with white gesso to mute the colors slightly. I then highlighted with Unicorn's Hair and White Pearl.
It's ALL in the video link above, except for the crackle paste, pebbles and die cuts.

Thanks for stopping by today!!!

Supplies:

Finnabair:

  1. Metallique Soft Satin 
  2. Metallique Steampunk Copper
  3. Sparks Unicorn Hair
  4. Wax - White Pearl
  5. White Sand Paste
  6. Moulds - Sharon Shiv Collection (tree branch), Elisian Clockworks, Scrolls
  7. Heavy White Gesso

Lindy's Embossing Powders:

  1. Bratwurst Brown
  2. Midnight Gold
  3. Sunrise Salmon Gold
Elmer's Glue (PVA Glue) followed by Mont Marte Crackle Paste

German Glitter Glass - Rust

Recollections Glitter - Champagne

Gold Pearls

White Pearls

Chipboard

Flowers by Paper Studieo

Home Decor item - Michael's (large gold trimming)

Poinsettia Skeletal Dies

Mistletoe Die

Leaves (various types)

Pebbles using clear Epoxy Resin

Wednesday, November 3, 2021

Mixed Media - Own Your Dreams

Sometimes I just really want to make "drama". The first time I attempted this color scheme, I failed with the background being too light...with a purplish tint. Not really what I wanted. I love extreme contrasts and gravitate towards that style in art more so than anything else (even though I do love browns and golds).

I went after my own inspiration with this color scheme. I didn't specifically have "plum" in my stash, but I did have poppy red.


THANKS FOR STOPPING BY TODAY!

Supplies:

Lindy's Stamp Gang:

  1.     Flat Danny Zuke's Denim
  2.     Flat Tweedle Dee Denim
  3.     Starburst Whale Watch Blue
  4.     EP Midnight Gold
  5.     Magical Shaker Black Forest Black
Finnabair supplies:
  1. Sparks Acrylic - Raven Black
  2. Bronze Age Wax
  3. Vintage Gold Wax
  4. Old Denim Wax

Hobby Lobby:
  1. Letters Chipboard
  2. Wood Gears
  3. Basic Shape Moulds

Scrapaholics Chipboard (at least three pieces)

Prima Marketing Moulds

Die Cuts with Stampendous Aged Marine Embossing Enamel

Buttons Galore Pearls

49 and Market Flowers


Monday, October 18, 2021

Altered Halloween Brush - Mixed Media

 Remember that phase where mixed media artists were altering paint brushes like crazy?

Well, I finally found a store where I could buy a larger brush for $2. 

I was hugely inspired by Sanna Suomalainen's Sparkling Nights video using various shades of black. I thought her piece was just gorgeous and I couldn't wait to try it for myself.

Other than having a different theme and adding a touch of Metallique Ginger Magic to my piece, I pretty much followed her steps. Her video is just fantastic.


1. I used black gesso on the entire brush except for the tip, which I left entirely alone.
2. I followed this with Jewel Paste Sparkling Onyx using a distressed diamond stencil.
3. Then I glued the lace down.


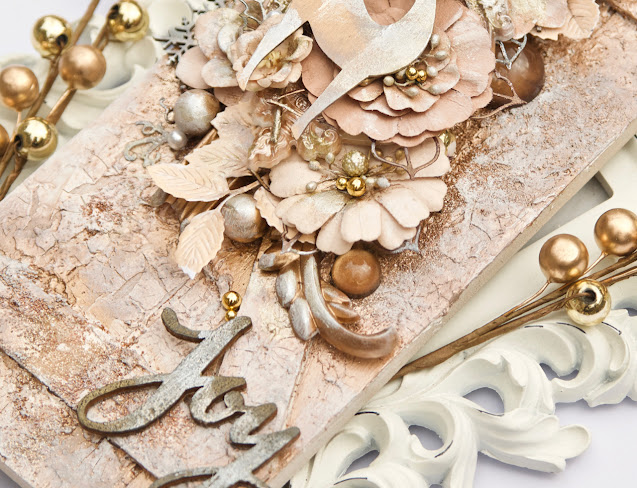
3. I gessoed all my individual pieces black before glueing. I find this to be easier than trying
to get the brush into small spaces.
4. I saved gluing the trinkets and flowers for later, as well the the pebbles with ginger magic.


5. Once the pieces were adequately dried in place, I began the coloring process. Letting the pieces settle into place after gluing means you can be a little more "rough" with your piece when applying color. This is very helpful for me as I'm a little bit clumsy.
6. I applied colors in this order:
 Charcoal Black wax, Graphite wax, Raven black paint, Old Silver wax, more raven black paint


7. I then glued my flowers down, adding Raven Black paint to dress them up quite a bit. 
8. I then added my pebbles with ginger magic around the piece.


9. Finally, covering up the main focus (cat skeleton is hard to see), 
I then added white gesso splatters.
10. I love videos. I truly appreciate everything women and artists go thru making them. If I were to add one little piece of advice that is not shown in any video that I've watched is this . . . after you start building your layers, let your glue dry. This is a patient process but start to finish it really takes no more than 2 - 3 hours. Go fold some laundry while it's drying. You are much more likely to regret trying to rush that one step.

Supplies:

Reneabouquet products:

  1. Reneabouquet Corner Web and Spider
  2. Reneabouquet Leaf filler
  3. Reneabouquet Lace

Tim Holtz Halloween trinkets

Creative Embellishments Spooky Tree

Straws

Prima leaf and roses moulds and time clock mould

Window from the dollhouse section at Hobby Lobby

Graphic 45 Black Roses

Finnabair Products:

  1. Charcoal Black Wax
  2. Graphite Wax
  3. Old Silver Wax
  4. Sparks Raven Black acrylic paint
  5. Sparks Ginger Magic acrylic paint
  6. Jewel Paste Sparkling Onyx
  7. Melange Art Pebbles


Friday, October 8, 2021

BOUNTIFUL FALL - Home Decor Mixed Media

Hello and welcome!! This is my latest home decor project for my favorite season...FALL!!! I made letters like this in the past using JOY (from Hobby Lobby) and crackle paste. Whelp, crackle paste has been rather difficult to get a hold of these days. So I tried something new...FolkArt Crackle Medium. 
Since it was my very first time using it I was amazed at the results. My other projects using crackle medium are even more detailed. Basically, the effect is similar to the swirls of alcohol ink, but also with some "crackle" effects as well.
The final finish was a glossy, glass like effect that is just gorgeous! I have more projects I will be posting soon, in which the effect is even more prominent than this first attempt.
What I learned:
1. Apply white gesso
2. Apply a full base color (you're lighter choice). I did not do this for this project. I should have.
3. Apply crackle medium. WALK AWAY....LET DRY ON ITS OWN. 
4. Come back and apply your next color choice (darker). I used Lindy's sprays since all the mediums      are water based. You can use acrylic paint as well.
5. Using your heat gun at this point is so fun and you will really see the pattern take a life of it's own.
    (much more prominent in my other projects)
6. Build your piece from there.
I gathered similar objects for each letter using Lindy's colors and 
ReneaBouquet products to dress it all up. 

I did use Bratwurst brown on the embossed writing on background. 
Graphite paste was used on the stenciling.

I have copper glitter from ReneaBouquet that really add a 
wonderful final touch to the letters.

Since the leaf had a larger base to work with, I felt the need to add "bountiful" 
from Creative Embellishments and the butterfly from ReneaBouquet.

Some of the flowers are Prima flowers. Don't forget to check out the little acorn 
and pumpkin tucked into each piece!


THANKS FOR STOPPING BY TODAY!

Supplies:

Lindy's embossing powders:

  1. Oktoberfest Orange
  2. Scratch Broom Yellow
  3. Bougainvillea Red Teal
  4. Bratwurst Brown
  5. Tennenbaum Green Gold
Lindy's Sprays
  1. Crow's Nest Copper
  2. Mango Mania
Creative Embellishments - Bountiful word

49 and Market flowers

Die Cut fillers foliage
Die Cut skeleton fall leaves

Reneabouquet
  1. Flowers
  2. Fall Beautiful board cutouts
  3. Pumpkin beautiful board cutouts
  4. Fall Leaves beautiful board cutouts
  5. Copper glitter
Graphite Paste and stencil

Gold beads

Prima Fall die cuts

Folk Art Home Decor Crackle medium


Saturday, September 25, 2021

Falloween - Reneabouquet Home Decor Mixed Media

Hello and welcome!! I am hosting a Reneabouquet  "Falloween" themed swap this month over at Scrapbook.com   

All the items on this home decor piece (5 1/4" x 5 1/4") are from Reneabouquet's shop except for the colors. I used my Lindy's products for the color scheme.

On a wonderful side note, Since the pandemic, I have been having trouble getting my hands on crackle paste. It's one of my favorite mediums to use. So I decided to try the Folk Art crackle medium, never having worked with it before. Luckily it's a water-based medium but the directions say to use "FolkArt Decor Chalk paint"...whatever. I used Lindy's sprays. 

Steps:

1. Apply white gesso to the base

2. Apply your lighter color choice (water based) all over and dry.

3. Apply Folk Art Crackle medium - WALK AWAY - LET DRY - FIND SOMETHING ELSE TO DO

4. Finally, apply your next darker color. Swirl and you can apply heat at this step.

5. Results - beautiful glossy, glass-like finish with swirls and cracks


Fall and Halloween are my favorite season and colors to work with.
 I love working with browns, golds, oranges, and greens. 

It can really add to a piece to finish it off with glass or glitter. 
Not only is it "sparkly", butseems to add another dimension to layering.

The Fancy Fall Corner has acorns and leaves in its design. But I need layers. 
Plus it's much easier to add embossing powder on separate pieces.

Isn't Darla the witch just beautiful? Be sure to catch the little opal beads
 placed around the piece as well.

Supplies:

Lindy's embossing powders:

  1. Oktoberfest Orange - I think they changed the name.
  2. Bratwurst Brown
  3. Tannenbaum Green Gold
  4. Midnight Pewter
Lindy's Sprays
Reneabouquet

Sunday, August 15, 2021

Mixed Media - Dreams Received

 Hello there!! I made this piece as part of an up-cycle challenge using ReneaBouquet's products at Scrapbook.com. 

My up-cycle product is COASTERS. That's right, the background of large circles are old coasters that I was tired of using.

There are so many variations of mixed media that I could have used to make this piece but I decided to stick with my absolute favorites technique...black gesso and waxes with the color scheme of denim and orange. All supplies are listed below.

Thanks for stopping by today!!


When working with Finnabair waxes, remember to go from dark to light. All the pieces were first covered in black gesso individually. I then added the background coasters and layered wax colors peacock, denim and blue lagoon using a really stiff brush. Then I built and glued the rest of the pieces and walked away, letting the glue settle and dry. This ensures the pieces stay in place when I work with the final colors. I added layers of meteor showers, firebird, and aged brass (in that order) to the elements. Lastly, I highlighted (especially faces) the pieces with white gold.


There is a window frame behind the dream catcher to help build up the piece and give it more of
 a 3-D look. The main focus is obviously the dream catcher but I can never resist adding more 
elements to my art. I love wings and flowers almost equally. The dream catcher, the wings and the flowers are all from ReneaBouquets online store.


Instead of adding a "dreamy" title, I decided to go with a Finnabair stamp mould "received". I really like how it contrasts against the beautiful, intricate pieces from ReneaBouquet.

Supplies:

8 x 8 Wood panel (Michael's)
Wooden Letters (Hobby Lobby)
Old Coasters (Up-Cycled)
Wooden Window (Hobby Lobby)

Beautiful Board Dream Catcher
Beautiful Board Wings
Handmade flowers - chocolate

Finnabair products:
Black Gesso
Moulds
Waxes:
    Old Denim, Peacock, Blue Lagoon
    Meteor Showers, Firebird, Aged Brass, White Gold


Monday, August 2, 2021

Mixed Media Canvas - Reflection

Hello everyone!! As you may know, I love making canvases and have made several pieces either for my home decor (rotated every season) or for loved ones. THIS piece is for me...about me. I had nearly every element in my stash that I could think of except one. No matter cause I just LOVE how this turned out. All the supplies are listed below. I'm not really going to explain what I did so much as why a piece is on this board.

The color scheme is even one of my favorites to work with soothing browns, metalliques and a touch of teal.
Roses everywhere - My favorite flower and Rose is my middle name
Steampunk - cause I love making steampunk mixed media

Dragons (even a little guy on the left) - I have always loved any type of fantasy. I love a good book with dragons in it.
Butterfly - I do love butterflies but it also reflects my love of nature. I prefer nature over cities any day.
Single solitary rose - My favorite book is Kushiel's Dart by Jacqueline Carey and the main character has a large tattoo of a rose with thorns and blood drops on her back, reflecting her unique nature in the world.

Here is a door with a tiny fairy and mushroom nestled into the corner. I have little pieces of fantasy all over this steampunk piece.

Book - I love to read. Especially fantasy.
Playstation controller - I have always played Final Fantasy using the Playstation...all the way back to Playstation 2.
XV (behind the book) - Tribute to Final Fantasy - my favorite game

And here is my tiny unicorn!!! I love unicorns so much that my family has started buying little gifts with unicorns on them again. Have you seen "The Last Unicorn"?

Dog - I love dogs, especially Shih-Tzus. My two dogs right now are Sky and Cassie. Plus I needed something on there for my 20 year career as an RVT. I'm a medical coder now, but veterinary medicine is my first love.
Swords - Tribute to fantasy and also that I love martial arts. Couldn't quite find what I wanted for this piece but I do have swords thanks to Katy Sue Designs.

Thanks for stopping by today!!!

 Supplies:

Lindy's Sprays:

  1. Opal Sea Oats
  2. Gossamer Gold
  3. Mission Bells Brown
  4. Dark Chocolate Truffle

Stampedous EP:

  1. Seasonings
  2. Shabby Pink

Finnabair

Graphite Texture Paste

Chipboard

Moulds from:

  1. Katy Sue Designs
  2. Finnabair
  3. Etsy

Waxes:

  1. Peacock
  2. Aged Brass
  3. Bronze Age
  4. Meteor Showers
  5. White Gold
Old chipboard 

Distressed diamond stencil

49 and market flowers

Graphite 45 flowers

White Gesso
Black Gesso

Monday, July 5, 2021

Mixed Media Anchor

 Hello there!! Today I would like to share with you an altered anchor I made to decorate my kitchen for the summer. Making summer pieces is hard for me cause I just don't feel like I always get the colors right. This piece is very light and I usually work with high contrast pieces as well. But...it's still pretty to me anyway!!!


Thanks for stopping by today!!

Supplies:

Chicken Wire stencil with distressed embossing powder

Tim Holtz crackle paste

Finnabair's Heavy White Gesso

Prima Moulds and flowers

Finnabair's Art Stones (all sizes)

49 and Market flowers

Twine

Pearls by Buttons Galore & More

SeaShells - Hobby Lobby

Wooden anchor base - Hobby Lobby

Lindy's Sprays

Sunday, June 27, 2021

Mixed Media - Cigar Box

Hello everyone!!! Today I am sharing with you an altered cigar box that I made for a ReneaBouquet swap challenge at Scrapbook.com. A lot of the swappers made beautiful boxes using patterned paper and goodies. I really wanted to stick with mixed media supplies only, and of course ReneaBouquet products.

My swap buddy said to "surprise her"... so I hope she loves it!!

I decided to use the following color scheme for her box:


I applied white gesso to the entire box, then went about "distressing" it with stencil, Lindy
sprays and embossing powders (all listed below).


The moulds I gessoed with black and then applied hazelnut paint, followed by waxes. The touch
of teal to the fillers really keep your eye on the center of the box. I chose to keep
the beautiful boards by Renea "naked" as it was already the perfect color to go with the scheme.


 Thanks for stopping by today!!!

Supplies:

Lindy's Sprays

  1. Opal Sea Oats
  2. Mission Bells Brown
  3. Dark Chocolate Truffle
Lindy's EP:

  1. EP Silver Moon Turquoise
  2. EP Desert Moon Copper Teal

Prima Moulds

  1. Fragrant Roses
  2. Gradeur Key Holes
  3. Aviary

Gold Pearls

Prima Flowers

49 and Market Flowers

ReneaBouquet Beautiful Board

Finnabair Metallique Hazelnut

Waxes

  1. Bronze
  2. White Gold
  3. Pearl

Stampendous EP Chunky Seasonings

Saturday, May 8, 2021

Hope

The other day I went "researching" thru Pinterest for inspiration and eye-candy. I found this coffee themed layout and I KNEW I wanted to recreate something of my own.

I have quite a few supplies left from my time with International Scrapbook Garden and one of the themes was this similar color scheme. So I dragged it all out (plus some) and slowly built this layout over two days.

Thanks for stopping by today!


Supplies:

--7 Dots Studio - Paint Chips 

Tim Holtz metal embellishments (frame and butterfly)

49 and Market flowers and stamps (hard to see)

Prima Marketing 
--flowers 
--key mold
--Shabby Chic Door Signs

Creative Embellishments: Chipboard and Stencils

Finnabair stencil and medium art stones

Acrylic Paint Viridian (mixed with white to make teal)

13@rts Ayeeda Yellow Splash Ink

Lindy's Stamp Gang
--Flat Fabio Sidewalk Chalk
--Flat Fabio Blazing Black
--Starburst Spray Tibetan Poppy Teal
--EP Scotch Broom Yellow
--EP Midnight Gold
--EP Cleopatra Copper

Tuesday, April 6, 2021

Mixed Media Canvas: Take Risks

 Hello there!

Today I would like to share with you my piece using the "gesso" technique. This piece uses two different colors of Lindy's: Cattail Copper Brown and Dark Chocolate Truffle. Plus a LOT of gesso. Apparently orange turns into pink when mixed with white.

The technique is pretty simple. Build up your canvas and add gesso to all your layers. Add color where you want it (Cattail Copper Brown). Add gesso again. Dry. Add again, dry. . . . and repeat many many times. Add layers of color for shadowing (that's the dark chocolate truffle) and repeat any layering of gesso you may want.

Thanks for stopping by today!!


Sunday, March 14, 2021

Mixed Media Canvas - Live in the Moment

Hello there! I've always struggled with making "spring" projects. Too much pastels? I do love a bright room with lots of light, but my art and I don't get along when I try to play with lighter colors. Besides, spring is messy and muddy, with lots of rain. Sure, there are beautiful tulips out there, but they are fleeting and gone almost instantly. 
But this!!?? Playing with browns, golds and greens!!! This I can get behind and still feel like it speaks "spring". I've started a whole wall of art that tells the story of Spring and am damn proud of it. And just LOVE it!!!
So forget those elusive, delicate pastels. Mud and moss is the way to go!!

Thanks for stopping by!


Supplies:

Lindy's Sprays:

  1. Caittail Copper Brown
  2. Dark Chocolate Truffle

Finnabair Products:

  1. Liquid Acrylic Burnt Sienna
  2. Icing Paste - White Gold
  3. Rust Effect Paste - Camouflage Paste Set
  4. Waxes - Firebird, Fire Ruby, Vintage Gold, Lucky Emerald, Aged Brass
  5. Moulds
  6. Art Pebbles

49 and Market:

  1. Blossom Blends - Coral and Mint
  2. Layered Embellishment Set - Wander

Tim Holtz Phrases

Dollhouse Window

Corrugated Cardboard


Friday, February 12, 2021

Mixed Media Canvas: Let Life Surprise You

 Nadya Drozdova is being featured on FB group #Irridescent Secrets with a challenge to make something that was inspired by her work.

Well... I've watched most of her youtube videos ... sometimes more than once. It's hard to pinpoint what exactly inspired me as a lot of my art has some inspiration from hers. But this video continues to be one of my favorites.

Thanks for stopping by today!!!!


Supplies:

Lindy's Sprays and EP:

  1. Moon Shadow - Golden Doubloons
  2. Starburst - Dark Chocolate Truffle
  3. Squirt - Poutine Gold
  4. EP - Midnight Gold
  5. EP - Angel Wings Gold

Finnabair:

  1. Rust Paste - Camouflage
  2. Waxes - Green Brocade, Lucky Emerald, White Gold, Graphite
  3. Heavy Black Gesso
  4. Graphite Paste
  5. Brick Stencil
  6. Icing Paste - White Gold
  7. Sparks paint - Butterfly spells
  8. Melange Pebbles
  9. Moulds
  10. Prima paper - Quartz

Stampendous Shabby Pink Embossing Enamel

Scrapaholics Chipboard

49 and Market - Wildflowers (Cream) and Stargazers (Petal Pink)

Hobby Lobby:

  1. Chipboard Letters
  2. Wooden Frame (dollhouse section)
  3. Art Palette

Old paintbrushes

Thursday, February 4, 2021

Story - A Mixed Media Canvas with Gelatos

 I made a piece a few years ago with gelatos that I just love. I really wanted to make another one, plus my sister wanted me to reach for purple flowers. This is the result! As far as mixed media canvases go, this was pretty easy to bring together.


Thanks for stopping by today!

Supplies:

Gelatos:

  1. Guava
  2. Peach
  3. Mango
  4. Bubble Gum
  5. Black Cherry

Finnabair:

  1. Metallique Acrylic Blackberry
  2. Moulds
  3. Stencil

49 and Market:

  1. Wildflowers - Violet
  2. County Blossoms - Violet
  3. Stamps - Gabi's square stitch
Watercolor paper
Black Gesso
Matte Acrylic Gel
Tombow Watercolor marker #989 (shading)

Monday, January 25, 2021

Mixed Media Canvas: Frosty

Hello again!!! I shared a frosty Cathedral piece a couple weeks with you and now want to share it's sister. I used the same color scheme, only this time adding silver. Can you see the little snowman tucked in there? He's from Prima's Sugar Cookie mould and just so adorable!!

This piece was inspired by Kasia Salmanowicz's "Altered Brush" with the Finnabair DT.


Thanks for stopping by today!!

 Supplies:

Lindy's Stamp Gang:

  1. Magical Shaker:  Bavarian Blue
  2. Azure Sea Asters
  3. EP Purely White

Finnabair Products:

  1. Liquid Acrylic Prussian Blue
  2. Metallique Wax White Pearl
  3. Metallique Wax Graphite
  4. Mould: Cogs & Wings
  5. Mould: Clockworks
  6. Mould: Sugar Cookie Christmas
  7. Snowflake Stencil
  8. Snowflake Paste
  9. Glitter

Other Products:

  1. EP Super Thick Silver
  2. Scrapaholics Chipboard
  3. Creative Embellishments Chipboard (Frosty)
  4. Letter Chipboard (Hobby Lobby)
  5. Buttons Galore Pearls
  6. Silver leaves (jewelry trinkets) - Amazon
  7. Rose flower and leaf moulds - Amazon


Monday, January 18, 2021

Mixed Media Just One Life

Hello there! There are times when a piece just comes together beautifully. I want to thank Martina Stoycheva with Cre-ART-Corner, because her piece greatly inspired this one. I had not really worked with brown, golds and greens before. I hope you find as much inspiration as I did.


Thanks for stopping by today!!

Supplies:

Lindy's Starburst:

Finnabair's:

  •     Liquid Acrylic Burnt Sienna
  •     Texture Paste White Sand
  •     Rust Pastes - Dusty, Dark Olive, Brown
  •     Prima Moulds
  •     Melange Pebbles
  •     Icing Paste - White Gold and stencil

    Metallique Waxes:

  •     White Gold
  •     Bronze Age
  •     Vintage Gold
  •     Firebird
  •     Aged Brass

49 and Market Garden Petals - Mint

Dusty Attic Chipboard

Creative Embellishments Mushrooms

Tim Holtz's phrases/titles

Gears and keys

Chipboard letters

Corrugated Cardboard


Monday, January 11, 2021

Mixed Media Winter Canvas

Hello!! Who knew simple could be so gorgeous??! 

This piece was inspired by Kasia Salmanowicz's "Altered Brush" with the Finnabair DT.

I am basically using one color highlighted by two different waxes. That is it. 


Thanks for stopping by today!!!

Supplies:

Tim Holtz's Cathedral Window

Transparency sheet (behind window)

Finnabair supplies:

  • Snowflake paste using snowflake stencil
  • Liquid Acrylic Prussian Blue
  • Metallique Wax White Pearl
  • Metallique Wax Graphite
  • Prima Mould (ice skates)
  • Tapestry Stencil
Other roses and leaf moulds from Amazon
Chipboard by Scrapaholics
Pearls by Buttons Galore & More

Monday, January 4, 2021

Mixed Media "Be Open to Whatever Comes Next"

Hello! Playing with sprays and masculine colors should not be difficult. In fact, I personally love the challenge since my husband and son prefer my less feminine art anyway.

This piece was greatly inspired by Jaya Raghuvanshi

Thanks for stopping by today!!

Supplies:

Lindy's Sprays:

Finnabair 

  •     Acrylic Sparks - Ginger Magic
  •     Metallique Wax - Firebird
  •     RE-Design Wax - Meteor Showers
  •     Metallique Wax - Bronze Age
  •     Texture Paste Graphite with Stencil
  •     Melange Pebbles
  •     Acrylic Opal Magic - Yellow/Pink (stars)

Dusty Attic Chipboard - stitches

Chipboard letters - Hobby Lobby

Buttons

Stars

Tim Holtz's sticker phrases

Stamping

Black gesso

Cheesecloth and thread