Showing posts with label Prima Marketing. Show all posts

Tuesday, January 4, 2022

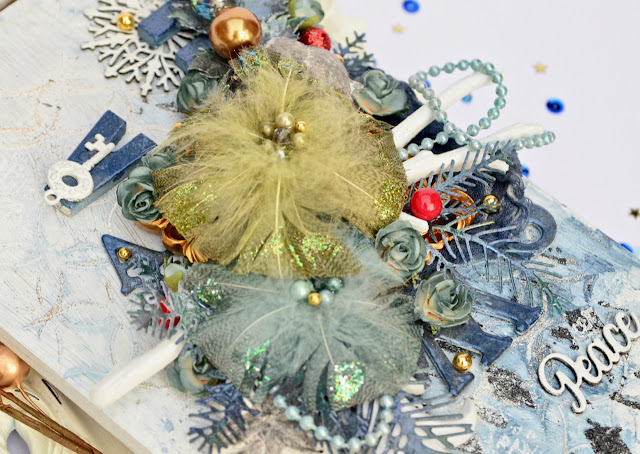
Mixed Media - Altered Sleigh

 I want to first thank Olga Ravenskaya for her inspiring video "altered wooden piece". There is always a point where I follow videos very closely and then veer off on my own. 

Earlier this year, I received an altered wooden box from Toni Burks, aka "Little Black Dress", in an exchange group filled with wonderful goodies!! I used a bunch of those goodies on this piece as well. Thank you so much Toni!

Finally, to those of you in the U.S. and close to a Target . . . go shop at the little "dollar" section up front when the seasons/holidays change. You will find wonderful things to alter in that section. This year I found a sleigh and wooden door (previous blog post). I've snatched up quite a few for upcoming, yearly projects, once they were 1/2 off of course.

Without further ado ... here is my latest piece!!


Supplies:

Lindy's Gang:

    Sprays:    

  1.     I'm late, I'm late Slate
  2.     Whale Watch Blue
  3.     Black Orchid Silver
  4.     Tweedle Dee Denim
  5.     Frolic in the Forest Black
  6.     Sidewalk Chalk
    Embossing Powders:
  1.     Twilight Blue Slate
  2.     Tennenbaum Green Gold
  3.     Purely White
  4.     Silver Moon Misteltoe
  5.     Angel Wings Gold
Prima Products:
  1. Moulds
  2. Flowers
  3. Stencils
  4. White Gesso
  5. Sparkling Onyx Paste
Creative Embellishments:
  1. Snowflake chipboard
  2. "Peace" chiopboard

Other:
  1. Letters and chipboard - Hobby Lobby
  2. Stash from Toni's goody box
  3. Leafy die cuts
  4. Gold Pearls
  5. Red Bangles - Flower section at Joann's
  6. Champagne Glitter - Michael's
  7. Sleigh - Target "Dollar" section

Wednesday, November 3, 2021

Mixed Media - Own Your Dreams

Sometimes I just really want to make "drama". The first time I attempted this color scheme, I failed with the background being too light...with a purplish tint. Not really what I wanted. I love extreme contrasts and gravitate towards that style in art more so than anything else (even though I do love browns and golds).

I went after my own inspiration with this color scheme. I didn't specifically have "plum" in my stash, but I did have poppy red.


THANKS FOR STOPPING BY TODAY!

Supplies:

Lindy's Stamp Gang:

  1.     Flat Danny Zuke's Denim
  2.     Flat Tweedle Dee Denim
  3.     Starburst Whale Watch Blue
  4.     EP Midnight Gold
  5.     Magical Shaker Black Forest Black
Finnabair supplies:
  1. Sparks Acrylic - Raven Black
  2. Bronze Age Wax
  3. Vintage Gold Wax
  4. Old Denim Wax

Hobby Lobby:
  1. Letters Chipboard
  2. Wood Gears
  3. Basic Shape Moulds

Scrapaholics Chipboard (at least three pieces)

Prima Marketing Moulds

Die Cuts with Stampendous Aged Marine Embossing Enamel

Buttons Galore Pearls

49 and Market Flowers


Monday, October 18, 2021

Altered Halloween Brush - Mixed Media

 Remember that phase where mixed media artists were altering paint brushes like crazy?

Well, I finally found a store where I could buy a larger brush for $2. 

I was hugely inspired by Sanna Suomalainen's Sparkling Nights video using various shades of black. I thought her piece was just gorgeous and I couldn't wait to try it for myself.

Other than having a different theme and adding a touch of Metallique Ginger Magic to my piece, I pretty much followed her steps. Her video is just fantastic.


1. I used black gesso on the entire brush except for the tip, which I left entirely alone.
2. I followed this with Jewel Paste Sparkling Onyx using a distressed diamond stencil.
3. Then I glued the lace down.


3. I gessoed all my individual pieces black before glueing. I find this to be easier than trying
to get the brush into small spaces.
4. I saved gluing the trinkets and flowers for later, as well the the pebbles with ginger magic.


5. Once the pieces were adequately dried in place, I began the coloring process. Letting the pieces settle into place after gluing means you can be a little more "rough" with your piece when applying color. This is very helpful for me as I'm a little bit clumsy.
6. I applied colors in this order:
 Charcoal Black wax, Graphite wax, Raven black paint, Old Silver wax, more raven black paint


7. I then glued my flowers down, adding Raven Black paint to dress them up quite a bit. 
8. I then added my pebbles with ginger magic around the piece.


9. Finally, covering up the main focus (cat skeleton is hard to see), 
I then added white gesso splatters.
10. I love videos. I truly appreciate everything women and artists go thru making them. If I were to add one little piece of advice that is not shown in any video that I've watched is this . . . after you start building your layers, let your glue dry. This is a patient process but start to finish it really takes no more than 2 - 3 hours. Go fold some laundry while it's drying. You are much more likely to regret trying to rush that one step.

Supplies:

Reneabouquet products:

  1. Reneabouquet Corner Web and Spider
  2. Reneabouquet Leaf filler
  3. Reneabouquet Lace

Tim Holtz Halloween trinkets

Creative Embellishments Spooky Tree

Straws

Prima leaf and roses moulds and time clock mould

Window from the dollhouse section at Hobby Lobby

Graphic 45 Black Roses

Finnabair Products:

  1. Charcoal Black Wax
  2. Graphite Wax
  3. Old Silver Wax
  4. Sparks Raven Black acrylic paint
  5. Sparks Ginger Magic acrylic paint
  6. Jewel Paste Sparkling Onyx
  7. Melange Art Pebbles


Friday, October 8, 2021

BOUNTIFUL FALL - Home Decor Mixed Media

Hello and welcome!! This is my latest home decor project for my favorite season...FALL!!! I made letters like this in the past using JOY (from Hobby Lobby) and crackle paste. Whelp, crackle paste has been rather difficult to get a hold of these days. So I tried something new...FolkArt Crackle Medium. 
Since it was my very first time using it I was amazed at the results. My other projects using crackle medium are even more detailed. Basically, the effect is similar to the swirls of alcohol ink, but also with some "crackle" effects as well.
The final finish was a glossy, glass like effect that is just gorgeous! I have more projects I will be posting soon, in which the effect is even more prominent than this first attempt.
What I learned:
1. Apply white gesso
2. Apply a full base color (you're lighter choice). I did not do this for this project. I should have.
3. Apply crackle medium. WALK AWAY....LET DRY ON ITS OWN. 
4. Come back and apply your next color choice (darker). I used Lindy's sprays since all the mediums      are water based. You can use acrylic paint as well.
5. Using your heat gun at this point is so fun and you will really see the pattern take a life of it's own.
    (much more prominent in my other projects)
6. Build your piece from there.
I gathered similar objects for each letter using Lindy's colors and 
ReneaBouquet products to dress it all up. 

I did use Bratwurst brown on the embossed writing on background. 
Graphite paste was used on the stenciling.

I have copper glitter from ReneaBouquet that really add a 
wonderful final touch to the letters.

Since the leaf had a larger base to work with, I felt the need to add "bountiful" 
from Creative Embellishments and the butterfly from ReneaBouquet.

Some of the flowers are Prima flowers. Don't forget to check out the little acorn 
and pumpkin tucked into each piece!


THANKS FOR STOPPING BY TODAY!

Supplies:

Lindy's embossing powders:

  1. Oktoberfest Orange
  2. Scratch Broom Yellow
  3. Bougainvillea Red Teal
  4. Bratwurst Brown
  5. Tennenbaum Green Gold
Lindy's Sprays
  1. Crow's Nest Copper
  2. Mango Mania
Creative Embellishments - Bountiful word

49 and Market flowers

Die Cut fillers foliage
Die Cut skeleton fall leaves

Reneabouquet
  1. Flowers
  2. Fall Beautiful board cutouts
  3. Pumpkin beautiful board cutouts
  4. Fall Leaves beautiful board cutouts
  5. Copper glitter
Graphite Paste and stencil

Gold beads

Prima Fall die cuts

Folk Art Home Decor Crackle medium


Monday, July 5, 2021

Mixed Media Anchor

 Hello there!! Today I would like to share with you an altered anchor I made to decorate my kitchen for the summer. Making summer pieces is hard for me cause I just don't feel like I always get the colors right. This piece is very light and I usually work with high contrast pieces as well. But...it's still pretty to me anyway!!!


Thanks for stopping by today!!

Supplies:

Chicken Wire stencil with distressed embossing powder

Tim Holtz crackle paste

Finnabair's Heavy White Gesso

Prima Moulds and flowers

Finnabair's Art Stones (all sizes)

49 and Market flowers

Twine

Pearls by Buttons Galore & More

SeaShells - Hobby Lobby

Wooden anchor base - Hobby Lobby

Lindy's Sprays

Sunday, June 27, 2021

Mixed Media - Cigar Box

Hello everyone!!! Today I am sharing with you an altered cigar box that I made for a ReneaBouquet swap challenge at Scrapbook.com. A lot of the swappers made beautiful boxes using patterned paper and goodies. I really wanted to stick with mixed media supplies only, and of course ReneaBouquet products.

My swap buddy said to "surprise her"... so I hope she loves it!!

I decided to use the following color scheme for her box:


I applied white gesso to the entire box, then went about "distressing" it with stencil, Lindy
sprays and embossing powders (all listed below).


The moulds I gessoed with black and then applied hazelnut paint, followed by waxes. The touch
of teal to the fillers really keep your eye on the center of the box. I chose to keep
the beautiful boards by Renea "naked" as it was already the perfect color to go with the scheme.


 Thanks for stopping by today!!!

Supplies:

Lindy's Sprays

  1. Opal Sea Oats
  2. Mission Bells Brown
  3. Dark Chocolate Truffle
Lindy's EP:

  1. EP Silver Moon Turquoise
  2. EP Desert Moon Copper Teal

Prima Moulds

  1. Fragrant Roses
  2. Gradeur Key Holes
  3. Aviary

Gold Pearls

Prima Flowers

49 and Market Flowers

ReneaBouquet Beautiful Board

Finnabair Metallique Hazelnut

Waxes

  1. Bronze
  2. White Gold
  3. Pearl

Stampendous EP Chunky Seasonings

Saturday, May 8, 2021

Hope

The other day I went "researching" thru Pinterest for inspiration and eye-candy. I found this coffee themed layout and I KNEW I wanted to recreate something of my own.

I have quite a few supplies left from my time with International Scrapbook Garden and one of the themes was this similar color scheme. So I dragged it all out (plus some) and slowly built this layout over two days.

Thanks for stopping by today!


Supplies:

--7 Dots Studio - Paint Chips 

Tim Holtz metal embellishments (frame and butterfly)

49 and Market flowers and stamps (hard to see)

Prima Marketing 
--flowers 
--key mold
--Shabby Chic Door Signs

Creative Embellishments: Chipboard and Stencils

Finnabair stencil and medium art stones

Acrylic Paint Viridian (mixed with white to make teal)

13@rts Ayeeda Yellow Splash Ink

Lindy's Stamp Gang
--Flat Fabio Sidewalk Chalk
--Flat Fabio Blazing Black
--Starburst Spray Tibetan Poppy Teal
--EP Scotch Broom Yellow
--EP Midnight Gold
--EP Cleopatra Copper

Friday, February 12, 2021

Mixed Media Canvas: Let Life Surprise You

 Nadya Drozdova is being featured on FB group #Irridescent Secrets with a challenge to make something that was inspired by her work.

Well... I've watched most of her youtube videos ... sometimes more than once. It's hard to pinpoint what exactly inspired me as a lot of my art has some inspiration from hers. But this video continues to be one of my favorites.

Thanks for stopping by today!!!!


Supplies:

Lindy's Sprays and EP:

  1. Moon Shadow - Golden Doubloons
  2. Starburst - Dark Chocolate Truffle
  3. Squirt - Poutine Gold
  4. EP - Midnight Gold
  5. EP - Angel Wings Gold

Finnabair:

  1. Rust Paste - Camouflage
  2. Waxes - Green Brocade, Lucky Emerald, White Gold, Graphite
  3. Heavy Black Gesso
  4. Graphite Paste
  5. Brick Stencil
  6. Icing Paste - White Gold
  7. Sparks paint - Butterfly spells
  8. Melange Pebbles
  9. Moulds
  10. Prima paper - Quartz

Stampendous Shabby Pink Embossing Enamel

Scrapaholics Chipboard

49 and Market - Wildflowers (Cream) and Stargazers (Petal Pink)

Hobby Lobby:

  1. Chipboard Letters
  2. Wooden Frame (dollhouse section)
  3. Art Palette

Old paintbrushes

Sunday, June 7, 2020

Mixed Media: The Bronze Age

What can I say?! I love making these little Finnabair wax projects and playing with different color combinations. I even made a wonderful decor spot for them all to go in my living room.

I've named this one: The Bronze Age. . . cause that is my base color. LOL . . . no? K.

Without further ado, here it is. Thanks for stopping by today!


Supplies:

Base - 6 x 6 triangle

Puzzle pieces - Dollar Tree
Creative Embellishments - large rose
Keys and Gears - Amazon
Dusty Attic Chipboard
Chipboard from HL
Tim Holtz metal frame
Stencil with modeling paste

Prima Marketing Mold:
Cogs and Wings
Flower Mold

Katie Sue Designs - Iron Alphabet

Finnabair Products:
Base:
Heavy Black Gesso
Bronze Age
White Gold
Silver

Separate Pieces:
Heavy Black Gesso
Fire Ruby
Red Amber
White Gold
Silver

Tuesday, May 12, 2020

Altered House - Mixed Media

Hello there! I follow many challenges, especially mood boards like this one from Mixed Media Place. But I don't always get around to participating, and when I do, I'm usually late to the party.

But this color combo and mood board spoke volumes to me!! It gave me the perfect opportunity to try a new combo with the Finnabair waxes (my newest love affair).

Thanks for stopping by today!!

Supplies listed below.


Supplies:

Wood house base 

Dylusions Mini Number Stencil
Chipboard and wood numbers from Hobby Lobby

Creative Embellishments chipboard

Dusty Attic Chipboard

Wooden Cogs

Finnabair and Prima Marketing Products:

Prima Marketing Molds:
Cogs and Wings
Delicate Floral Redesign
Roman Numerals

Art Pebbles

Waxes:
Amethyst Magic
Lucky Emerald
Re-Design Meteor Showers
Old Silver


Wednesday, May 6, 2020

Ladies Night In: Mixed Media Canvas

A lot of times I make projects cause inspiration hit me over the head by talented artists. I was hugely inspired by Yulia Pospelova's piece on her YouTube channel.

This month's Creative Embellishments challenge is fun and can be interpreted so many different ways. I love art like this and can come up with about 10 completely different ways to be inspired.


My piece is all about time well spent with my girlfriends. I miss them bunches during these crazy days. Chatting and laughing about motherhood, husbands, jobs and life is what having girlfriends is all about.


Friends bring new experiences and "color" into your life. They manage to mold and "fit" into the foundation that is you. For this piece I used about 8 different colors. I'm not sure how it all works, but give a go if you are inspired. (Supplies listed below.)


49 and Market flowers mixed with Finnabair molds and paint, Creative Embellishment's chipboard and Lindy's sprays.


The leaf is leftover from another project. I know it's darker than the rest of the piece but somehow it works with the crazy color scheme anyway.


Paints and sprays are best used separately when working with a piece, in my craft room anyway. The colors pop and do not become muddy when swirling with other mediums.

THANKS FOR STOPPING BY TODAY!!

Supplies:

10" Circle Board - Michael's

Finnabair and Prima Marketing:

1. Molds:
--Cogs and Wings
--Stars and Moons
--Leafy Blossoms
--Other
2. Metallique Paint:
--Frozen Berries
--Plum Preserves
3. Opal Magic:
--Yellow/Pink
--Teal/Pink
4. Art Pebbles - mixed sizes
5. Tapestry Stencil
6. Texture Paste - Graphite

Creative Embellishments
--steampunk
--chains
--cogs
--timepiece

49 and Market - Blossom Blends - Sea Breeze

Lindy's Stamp Gang:

--Starburst Squirt - Polite People Purple
--Starburst Squirt - Poutine Gold
--Starburst Spray - Cowabunga Copper

Tim Holtz - Old Time Die Cuts

Background Stamp - cursive writing

White Gesso

Cheese Cloth

Feather

Thursday, April 9, 2020

Beauty Within - Mixed Media Canvas

Hello there!! Today I would like to share my latest canvas using many Finnabair's products, Prima Marketing products, 49 and Market flowers, Lindy's colors, Dusty Attic chipboard and Creative Embellishment chipboard.

Hope you are inspired!!!


Layers using Creative Embellishments Corsets and Autumn Leaves Set, wooden cogs, 49 and Market flowers Linen and Cantaloupe and Prima Wings and Swirls mould shown here.

Dusty Attic chipboard shown here. Plus Finnabair Graphite Paste along with Lindy's Squirt Poutine Gold, and Starburst Cattail Copper Brown.


I layered my moulds with Finnabair's Blackberry, followed by Red Wine. Topped them off with Vintage Gold Wax. 


The bottom of the pebbles were colored with Red Wine.


THANKS FOR STOPPING BY TODAY!


Other products:


Wednesday, February 5, 2020

Mixed Media Canvas: Dream


Hello everyone! Although I follow many challenge groups, I don't always get a chance to participate. Here is Creative Embellishments challenge for the month of January. I also loved the color scheme of Lindy's challenge for this month and decided to mix them up.


Red and pink are classic for February, but I immediately reached for my pink and chocolate stash with Lindy's, which is perfect for the bottom, middle photo with Creative Embellishments.


 My first layer here is a brick background with modeling paste and a large swirly chipboard piece by Creative Embellishments. Then I began adding Lindy's colors: Creme Brûlée Creme, Milk Chocolate Brown, and Cosmopolitan Pink.


My titles for these projects are usually decided last. That's because I just never know how
it's going to turn out and what will be the best fit. This title, from Creative Embellishments is embossed with Lindy's embossing powder, Midnight Gold, easily one of my favorite powders.


Here you can see layers of gears, both metal and chipboard, the birdcage (Creative Embellishments), fussy-cut flowers, 3-D flowers and finally the moon himself. There are layers of sprays using pinks and chocolates.
To add a bit of extra shimmer to my project I used Cosmic Shimmer Gliding Flakes, purchased
at a local craft store. Love that stuff!!!!


One thing I'm learning about mixed media is to not be afraid to be messy with your flowers.
Use complimentary colors in your stash to brighten them up and use gesso to distress them a bit.


THANK YOU FOR STOPPING BY TODAY!!!


Gesso: Black and White

Lindy's Stamp Gang Starburst:
--Cosmopolitan Pink
--Cotton Candy Pink
--Dark Chocolate Truffle
--Milk Chocolate Brown
--Creme Brulee Bream

Lindy's Embossing Powder: Midnight Gold

Prima Marketing/Finnabair:
--Moon and Stars Mould
--Wax Vintage Silk
--Wax Royal Robes
--Melange Art Pebbles

Blue Fern patterned paper

Creative Embellishments Chipboard (birdcage, large vine, and title)

Metal Charms: Gears (Amazon)

Cosmic Shimmer Gliding Flakes

Paper Studio Poppies flowers

Twine

Tim Holtz Butterflies

Brick Stencil