Showing posts with label Home Decor. Show all posts

Tuesday, May 10, 2022

Mixed Media - All About Spring

Hello everyone! Here is my Spring project for 2022. I wanted this to display the riot of colors that a lovely spring garden can hold. Especially if garden was tended by me  . . . cause I'm not much of a gardener.

Sprapaholics has the best spring garden boots in their chipboard stash and I just loved using it here. Imitating spring, I used several types of textures from various places in my stash, including Renea Bouquets beautiful board, 49 and market flowers, spongy moss, and more!

Thanks for stopping by today!!


The base is a corkboard cutting board I found in Home Goods. The texture and design is perfect to use in MM projects (I found it on sale).


The paper leaves were embossed using Sunrise Salmon Gold and Beaucoup Mint. I'm not sure why I felt the need to stick a time piece on this project, but there it is.


The chipboard boots were embossed with Bratwurst Brown and Stampendous' Seasonings. I added a little extra distressing using gesso.


There are hints of molds in this piece that have a more "watercolor" look. I wanted the texture, but knew the boots were the main attraction. So the moulds add dimension and interest without taking your eyes away from the main attraction.


I've been saving this spongy moss in my stash for a spring project. I thought it really made a wonderful barrier between the two sides of the piece.


THANKS FOR STOPPING BY TODAY!

Supplies:

COLORS

Lindy's Embossing Powders:

  1. Sunrise Salmon Gold
  2. Merci Beaucoup Mint
  3. Bratwurst Brown
  4. Orange Creamsicle

Lindy's Sprays:'

  1. Mission Bells Brown
  2. Wild Honeysuckle Coral
  3. Orange Creamsicle

Stampendous Chunky Metallic "Seasonings"

Finnabair Opal Magic Coral-Green

Tim Holtz Distressed Powder Vintage Photo

Acrylic Paint:

  1. Brown
  2. Burnst Sienna
  3. Brilliant Yellow-Green
TEXTURES

Scrapaholics chipboard
ReneaBouquet chipboard
Creative expressions chipboard

Spring moss

Art pebbles

49 and Market flowers

Finnabair moulds

Die cut leaves and fillers

Metal embellishment

Tuesday, January 4, 2022

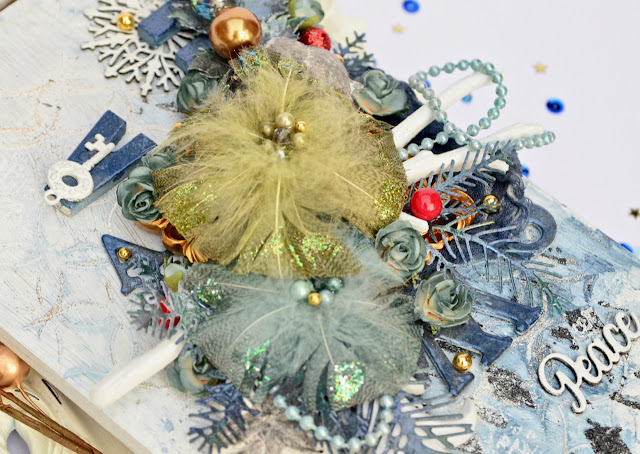
Mixed Media - Altered Sleigh

 I want to first thank Olga Ravenskaya for her inspiring video "altered wooden piece". There is always a point where I follow videos very closely and then veer off on my own. 

Earlier this year, I received an altered wooden box from Toni Burks, aka "Little Black Dress", in an exchange group filled with wonderful goodies!! I used a bunch of those goodies on this piece as well. Thank you so much Toni!

Finally, to those of you in the U.S. and close to a Target . . . go shop at the little "dollar" section up front when the seasons/holidays change. You will find wonderful things to alter in that section. This year I found a sleigh and wooden door (previous blog post). I've snatched up quite a few for upcoming, yearly projects, once they were 1/2 off of course.

Without further ado ... here is my latest piece!!


Supplies:

Lindy's Gang:

    Sprays:    

  1.     I'm late, I'm late Slate
  2.     Whale Watch Blue
  3.     Black Orchid Silver
  4.     Tweedle Dee Denim
  5.     Frolic in the Forest Black
  6.     Sidewalk Chalk
    Embossing Powders:
  1.     Twilight Blue Slate
  2.     Tennenbaum Green Gold
  3.     Purely White
  4.     Silver Moon Misteltoe
  5.     Angel Wings Gold
Prima Products:
  1. Moulds
  2. Flowers
  3. Stencils
  4. White Gesso
  5. Sparkling Onyx Paste
Creative Embellishments:
  1. Snowflake chipboard
  2. "Peace" chiopboard

Other:
  1. Letters and chipboard - Hobby Lobby
  2. Stash from Toni's goody box
  3. Leafy die cuts
  4. Gold Pearls
  5. Red Bangles - Flower section at Joann's
  6. Champagne Glitter - Michael's
  7. Sleigh - Target "Dollar" section

Monday, December 6, 2021

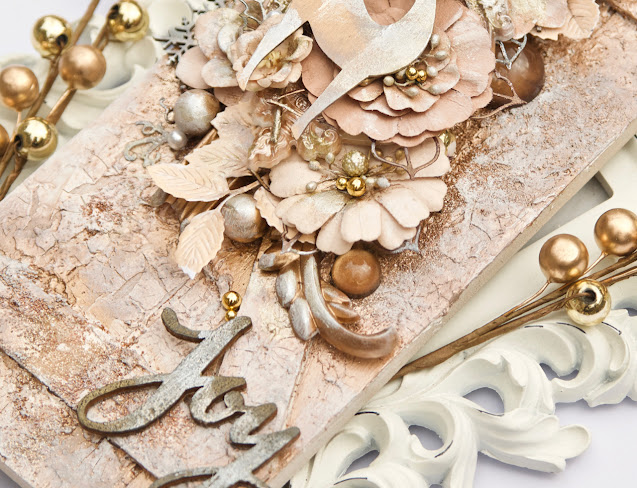
Mixed Media - Altered Wooden Door - Joy

Welcome! Today I would like to share with you my first Christmas decor of the season. 

Won't lie . . . this took quite a bit of planning and set-up. I had to order the colors, order crackle paste, cut the dies, shop for glitter and create the moulds. That just means I now have all the supplies in my stash for the next one!

I was hugely inspired by the video of "Altered Brush" by Sanna Suomalainen. I used her process and colors scheme while adding my own twist to my piece.

All the supplies are listed below.


First I applied gesso, followed by PVA glue (Elmer's glue) then the crackle paste. Finnabair's crackle paste seems to be impossible to get here in the U.S. these days so I'm having to go a different route.
This step alone took several hours cause needed to let dry without using the dry heat gun.


I then applied White Sand paste, followed by glitter. Once that dried, I began the color process with Soft Satin and Steampunk Copper.


The composition of this piece went fairly quickly. I did use Lindy's embossing powders on my die cuts to add just a little more dramatic effect.


The title is embossed with Midnight Gold. The whole piece was then dusted with white gesso to mute the colors slightly. I then highlighted with Unicorn's Hair and White Pearl.
It's ALL in the video link above, except for the crackle paste, pebbles and die cuts.

Thanks for stopping by today!!!

Supplies:

Finnabair:

  1. Metallique Soft Satin 
  2. Metallique Steampunk Copper
  3. Sparks Unicorn Hair
  4. Wax - White Pearl
  5. White Sand Paste
  6. Moulds - Sharon Shiv Collection (tree branch), Elisian Clockworks, Scrolls
  7. Heavy White Gesso

Lindy's Embossing Powders:

  1. Bratwurst Brown
  2. Midnight Gold
  3. Sunrise Salmon Gold
Elmer's Glue (PVA Glue) followed by Mont Marte Crackle Paste

German Glitter Glass - Rust

Recollections Glitter - Champagne

Gold Pearls

White Pearls

Chipboard

Flowers by Paper Studieo

Home Decor item - Michael's (large gold trimming)

Poinsettia Skeletal Dies

Mistletoe Die

Leaves (various types)

Pebbles using clear Epoxy Resin

Friday, February 12, 2021

Mixed Media Canvas: Let Life Surprise You

 Nadya Drozdova is being featured on FB group #Irridescent Secrets with a challenge to make something that was inspired by her work.

Well... I've watched most of her youtube videos ... sometimes more than once. It's hard to pinpoint what exactly inspired me as a lot of my art has some inspiration from hers. But this video continues to be one of my favorites.

Thanks for stopping by today!!!!


Supplies:

Lindy's Sprays and EP:

  1. Moon Shadow - Golden Doubloons
  2. Starburst - Dark Chocolate Truffle
  3. Squirt - Poutine Gold
  4. EP - Midnight Gold
  5. EP - Angel Wings Gold

Finnabair:

  1. Rust Paste - Camouflage
  2. Waxes - Green Brocade, Lucky Emerald, White Gold, Graphite
  3. Heavy Black Gesso
  4. Graphite Paste
  5. Brick Stencil
  6. Icing Paste - White Gold
  7. Sparks paint - Butterfly spells
  8. Melange Pebbles
  9. Moulds
  10. Prima paper - Quartz

Stampendous Shabby Pink Embossing Enamel

Scrapaholics Chipboard

49 and Market - Wildflowers (Cream) and Stargazers (Petal Pink)

Hobby Lobby:

  1. Chipboard Letters
  2. Wooden Frame (dollhouse section)
  3. Art Palette

Old paintbrushes

Saturday, May 2, 2020

Steampunk Canvas - Fortnite Gaming Canvas

Today's post is all about the journey to the making of this piece, in which the whole family was involved!!!! Supplies listed below.

I just loved the piece by Anika Blumenthal named House of Imagination. I have made several pieces based on her original video and flow of how she applied the waxes. By keeping the two color schemes separate, the art really pops. When I stepped into the world of steampunk (and this style specifically), my husband and son really perked up. So much so that my visionary 13 year old asked, "Mom, can you make me a Fortnite scrapbook page so I can hang it in my room?"

Me, "Oh? Do you want a page or a steampunk piece like this star?"

Son, "Piece like the star."

Me, "What kind of base do you want? Star? Circle? Square? Rectangle?"

Son, "The map of Fortnite."

Wow. Alrighty then.


I went shopping online for several days. I had it in my head that I really needed more "boy" like molds to work with and I had my heart set on pipes and anything else I could find.

First, I ended up at Etsy where I discovered the GamerGirl Mold. I just HAD to have that. THREE days later I finally came across Katy Sue Designs based both here and in the U.K. I could have bought so many fabulous molds that I had to restrain myself to just two,  the "rusty pipes" and "iron alphabet" (to be used later).  (There is the nasty little thing called a "budget" that I need to live by.)


The next stage was the title and map. I was able to download the font style for free, in which I cut out the font using SCAL4 and my silhouette (about 2"). Next, I went hunting for the Fortnite map. I dusted off some serious Pixelmator and SCAL4 skills. I outlined a map in Pixelmator, then took that image and traced it into my SCAL4 program. The map is about 10" is diameter.


Finally came my husband! He took the cutouts (letters and map), traced onto a wood sheet, then used his "wood cutting machine thingy" to cut out the pieces.


My son knew what colors he wanted so all I really had to do next was build the composition.....


It was a happy ending!!!

THANKS FOR STOPPING BY TODAY!!
Supplies:

Finnabair:

Heavy Black Gesso

TCW Stencil - Riveted
Dylusions Stencil - Numbers

Modeling Paste

Finnabair Moulds:
Suns and Moons
Roman Numerals
Cogs and Wings

Katy Sue Designs Molds:
Rusty Pipes

TheDecodenDiva: Gamer Girl Mold

Creative Embellishments chipboard;
Scribble Bulbs

Dusty Attic Chipboard

Tim Holtz Grungeboard

Metal Embellishments

Waxes:
(In order used)

Turquoise Satin - base
Peacock - 2nd layer base

Hint: When working with black gesso, it's important to go from dark to light.
--Everything else:
Amethyst Magic
Red Amber
Fire Ruby (just a smidgen)
Vintage Gold
White Gold (highlights)

Tuesday, December 24, 2019

Happy Holidays Home Decor - Mixed Media

Lots and lots of fussy cutting and layering  ..... and here we are!!!!

Merry Christmas and Happy Holidays!!


I had a huge package of poinsettias (from Hobby Lobby) that I bought years ago and I have used them on several projects. I finally used of the last of them with this creativity.


While some of the layers were pre-made poinsettias, I did fussy cut a lot from Graphic 45's 12 Days of Christmas to fill out this piece. I especially love the birds.


I didn't want this piece to be overwhelmed with texture, so I just used crackle paste only as the primary texture. I let that dry overnight and then added colors, followed by the art stones and glitter.


The green and red beads were found at a yard sale!!! But really, this piece is just lots of layers using Graphic 45, poinsettias, pinecones and beads.

Thanks for stopping by today!!

Round wooden piece - Michael's

Graphic 45 - Twelve Days of Christmas

Poinsettia flowers - Hobby Lobby
Beads and Pinecones - Hobby Lobby
Gold Glitter - Hobby Lobby

Finnabair Art Stones

Lindy's Stamp Gang:

Starburst Golden Sleigh Bells
Starburst Rudolph Rose Red
Starburst Frolic in the Forest Black

Wooden Window

Crackle Paste

Flair button from . . . ?

Thursday, December 5, 2019

Joy - Home Decor - Lindy's December challenge

Hello!! Inspiration can be found many ways. You can find it from an entire project, a technique, a color scheme, or even a cluster of flowers.

I found my inspiration from here, created by Nuneka. I also found inspiration simply from Lindy's December color challenge.

Isn't it stunning?!


These decor letters can be found at Hobby Lobby, all ready for you to make something fabulous. The base is covered with white gesso followed by crackle paste all over. The next day I then slowly added the blues: Tilt-A-Wheel Teal and Bavarian blue. Once I was satisfied, I added more texture using modeling paste, stencil and glitter. Once completely dry I sealed with matte gel and left overnight to dry.


Meanwhile, I made poinsettias from dies. This can either be rather relaxing or tedious, depending on how impatient you are. Once I got all the flowers, leaves and fillers cut out, I then added embossing powder to the leaves and fillers using Polka Purple, Madonna Robe Blue, and Merci Beaucoup Mint. The main poinsettias are inked with purple hydrangea chalk ink.


Personally, I think the hardest part in all this is the gluing. I spend several minutes after each project scrubbing my hands repeatedly. 
But it's ALL worth it cause I just LOVE how this turned out.

THANKS FOR STOPPING BY TODAY!!


Supplies:

Lindy's Products:


Finnabair Pastel Glitter

Prima Stencil - Tapestry

Crackle Paste

Creative Expression poinsettia dies (open cut)
Creative Expression fillers
Impression Expression poinsettia dies

Versa Magic chalk ink - Purple Hydrangea

Floral fillers - Hobby Lobby
JOY home decor - Hobby Lobby

Pinecone

Aleene's Tacky Glue

Pearls

Tuesday, December 3, 2019

Craft All Day

Hello there!!!

I received this little home decor item as a free gift from Scrapbook.com with a purchase. It was a fun afternoon playing around with it.


Supplies:

Craft All Day home decor piece

49 and Market vintage flowers
Creative Expressions Fillers and open flowers

Lindy's Stamp Gang:

Starburst Creme Brûlée Cream
Starburst Azure Sea Asters
Starburst Tibetan Poppy Teal
Flat Sidewalk Chalk
EP - Candy Rose
EP - Bonjour Butter

Stencils and modeling paste

Finnabair Red Rust Paste

Wednesday, December 6, 2017

ISBG: Apothecary

Hello there! Today is a new project using the Spider's Web kit from

I bought a wooden plaque from Michael's for this project. If I were to make a 
card like this, I just know I would never be giving it away. So,
I made a plaque as home decor piece instead.


I'm beginning to think that mixed media was "invented" around Halloween.
What other time of year can you bring so many wonderful techniques
and array of colors together?


Call me sinister and creepy . . . but I just love that skull!


The twine is from my own stash and the leaves are Spellbinders'
die cuts, with Tidy Widy scattered around them.
 I layered a tree, flower, leaves, twine and phrases.


I did use my own stencil to create the layered effect
on the background. There is tree covered in the Tidy Widy,
from the mixed media kit, as the bottom layer.


Yep, those are bones tucked in behind the flower!

Thanks for stopping by today!!!